


カスタムキャストでVtuber配信がしたい!でも複雑そう……。カスタムキャストの使い方も知りたいな。
使い方をわかりやすく解説していくよ!
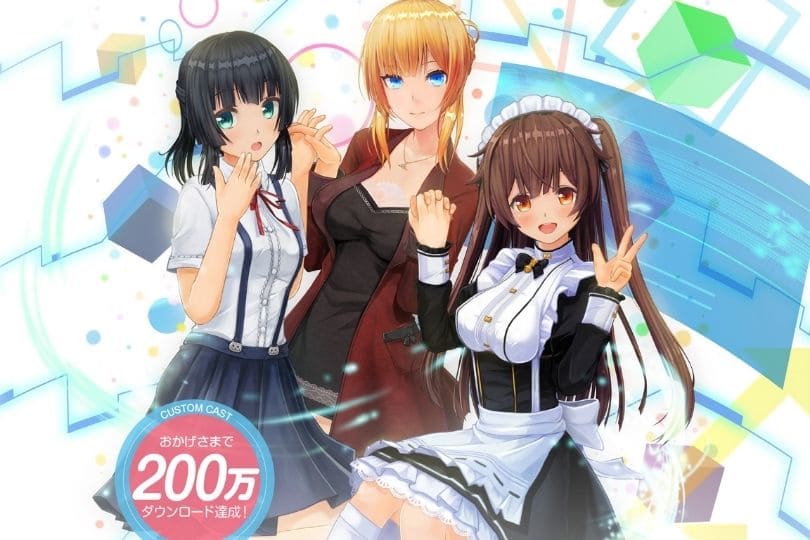
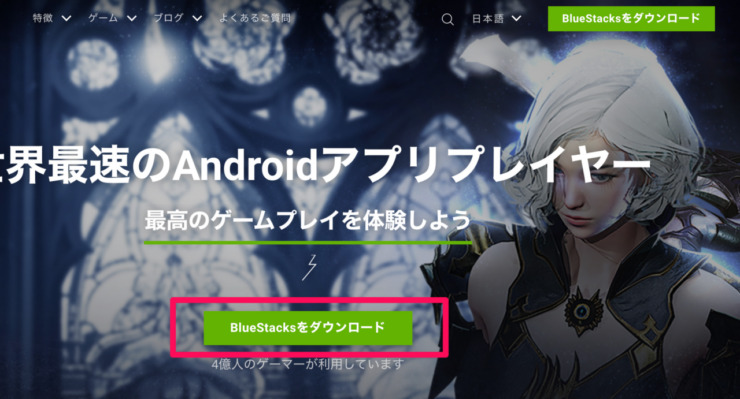
カスタムキャストは、手軽にバーチャルのアバターを作れるライブ配信アプリです。作成したアバターを使ってVtuberさながらに配信をすることもできます。
バーチャルと聞くと「複雑な操作が必要なのでは?」と思う方もいるかもしれませんが、カスタムキャストでは簡単にアバターを作って配信することが可能です。
本記事ではおすすめVtuberアプリのなかのひとつである、カスタムキャストの特徴や使い方について解説します。

カスタムキャストとは?
カスタムキャストとはの特徴は下記のとおりです。
- スマホ向けバーチャルライブアプリ
- 3Dアバターを簡単に作れる
- スマホのフリック1つで簡単に表情などを操作できる
- Vtuber配信が簡単に行える
- リリースから11日で100万ダウンロード達成
カスタムキャストがあればどこでも簡単にVtuberとして、配信ができます。
カスタムキャストの使い方
ここでは、カスタムキャストの使い方を紹介します。
流れは以下の通りです。
- カスタムキャストのダウンロード
- キャラメイクで自分好みのアバターを作る
詳しく解説していきますね。
カスタムキャストのダウンロード
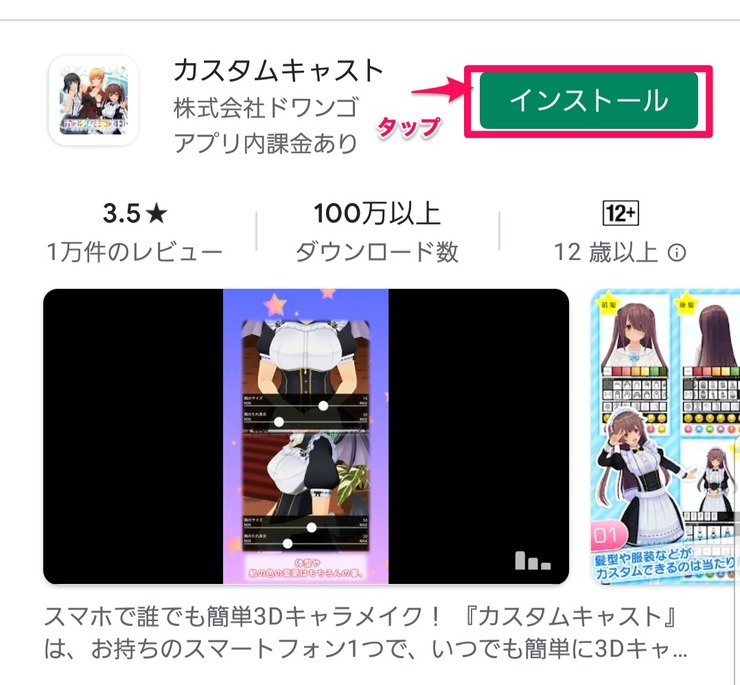
- STEP
ストアからカスタムキャストをインストール(AndroidはPlayストア、IOSはアップルストア)

インストールをタップ - STEP
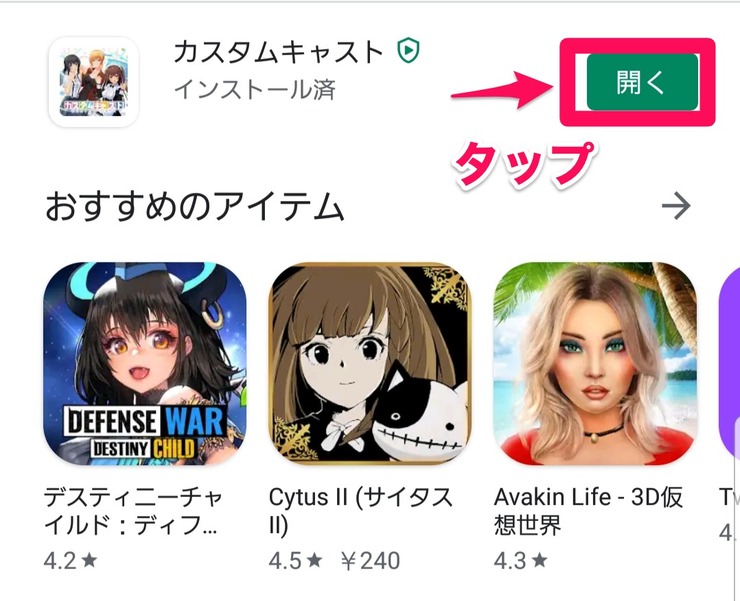
アプリを開き、ダウンロード
インストール後開くをタップ アプリを開くとトップ画面に遷移します。
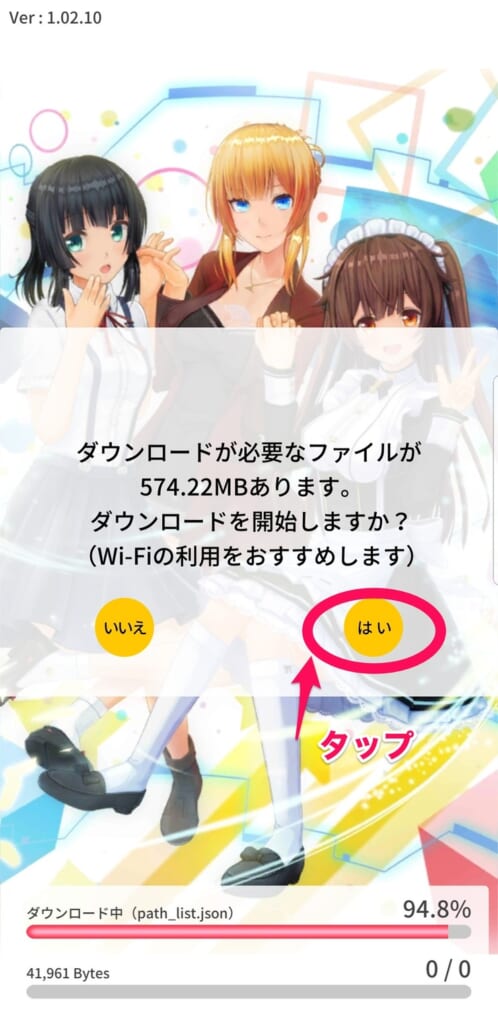
ダウンロードをするために、「はい」をタップしてください。
トップ画面に遷移 - STEP
トップ画面に遷移後、名前を入力し「はい」をタップ
トップ画面 ①名前入力②はいをタップ
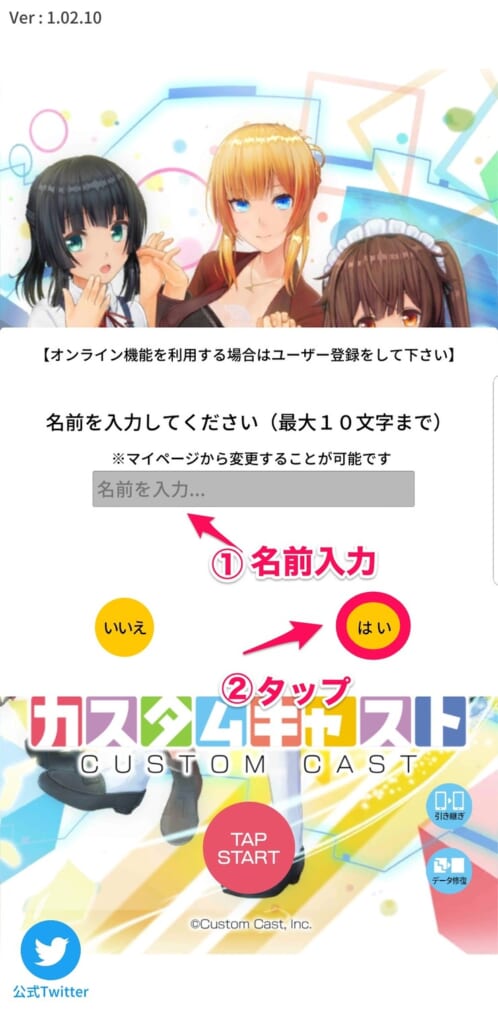
以上で、カスタムキャストのダウンロードは完了です。
キャラメイクで自分好みのアバターを作る
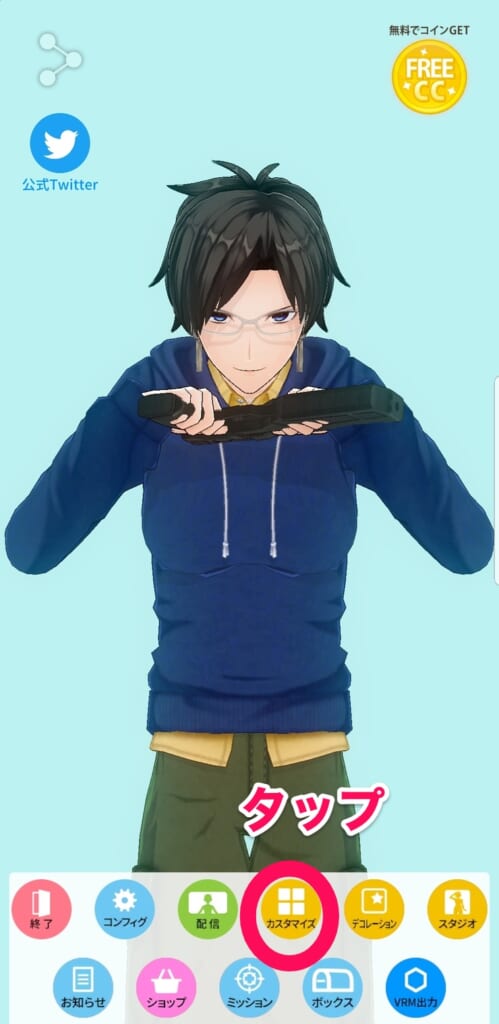
ダウンロードが済んだら、さっそく自分好みのアバターの作成に取りかかりましょう。
トップ画面の下に「カスタマイズ」という項目があるので、タップしてください。
次に新規をタップします。
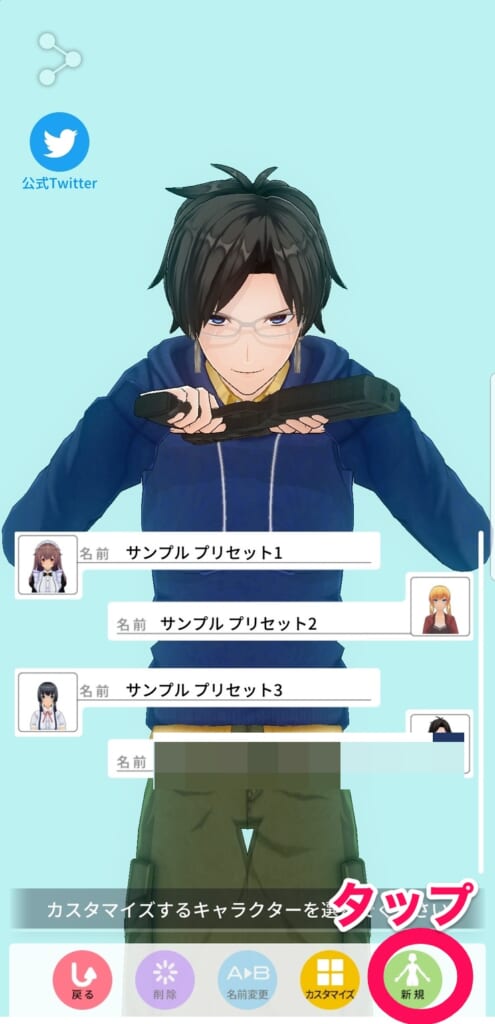
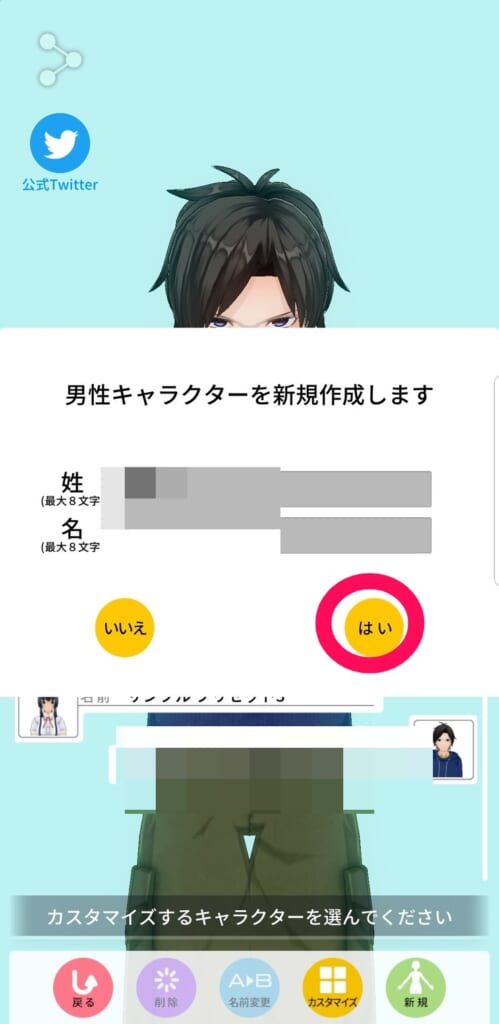
性別を選択し、「はい」をタップします。
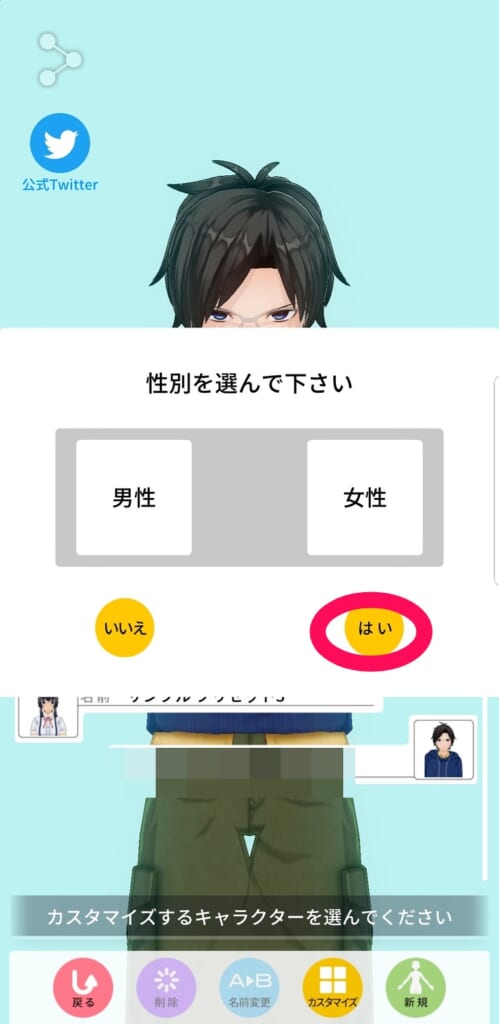
最後に名前を決めて、「はい」をタップしてください。
プロフィールの設定が完了すると、以下画面に遷移します。
右下のカスタマイズをタップしてください。
カスタマイズの中身は、
- ボディカスタム
- ボディパーツ
- ドレスパーツ
- パーツカスタム
- プリセット
- ランダム
です。
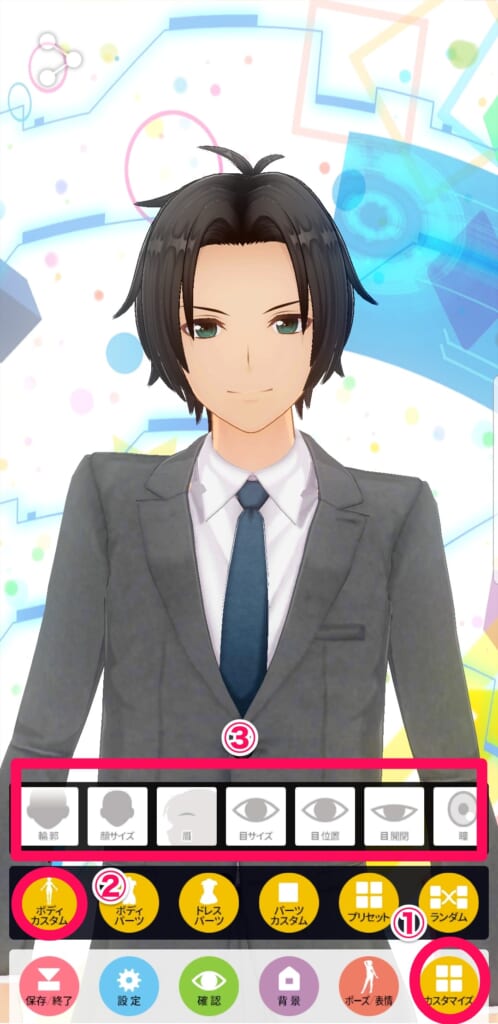
ボディカスタム
まずは、ボディカスタムから設定していきます。
ボディカスタムの項目では、
- 輪郭
- 顔のサイズ
- 眉
- 目のサイズ
- 目の位置
- 目の開閉
- 瞳の色
- 身長
- 胸の形
- 胸の位置
- 胴体
- 首/肩
- 腕
- 尻
- 脚
の設定ができます。
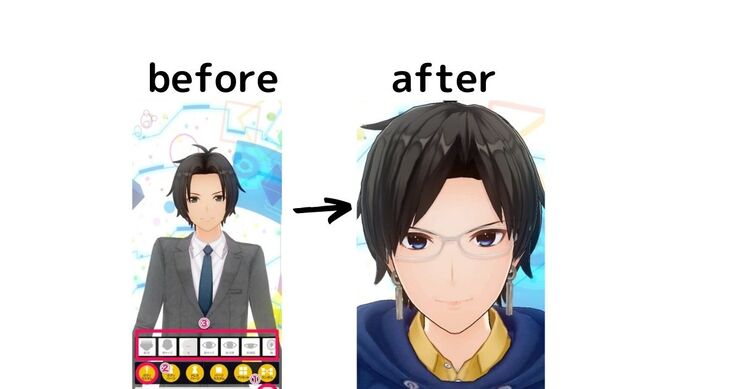
設定を終えると、以下のようになりました。
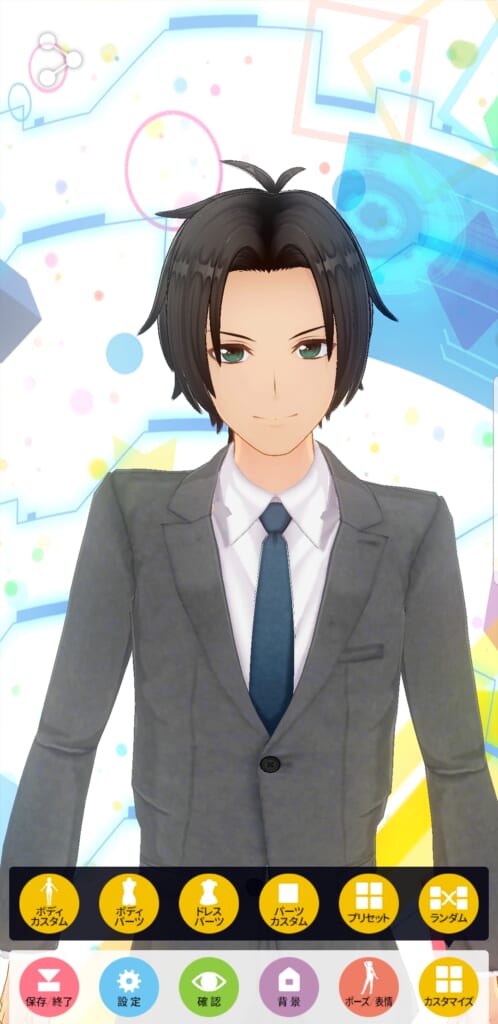
変わったかといえば変わりましたが、あまり変化はわからないですね。
ボディパーツ
今度はボディーパーツを設定してみます。
①カスタマイズから②ボディーパーツをタップしてください。
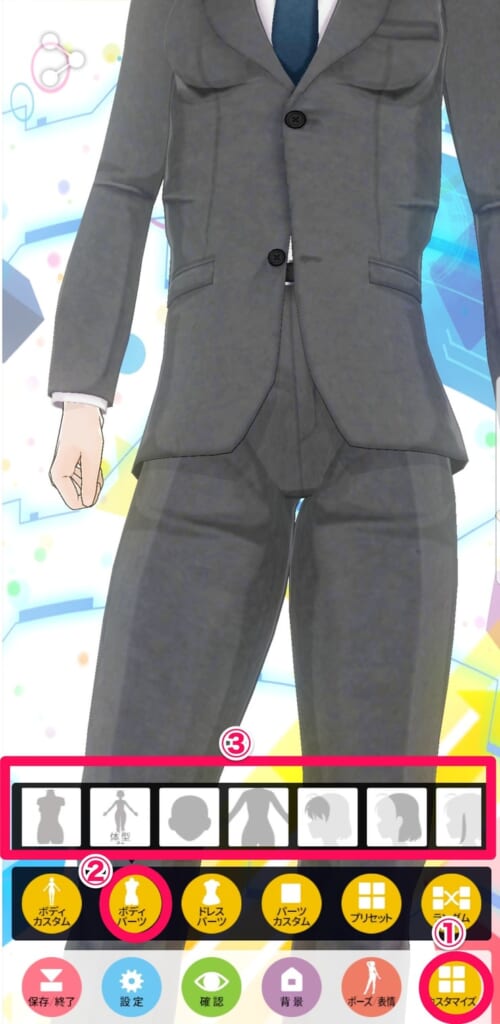
ボディパーツで設定できるのは、
- 女か男の体型
- 体型
- 目のパーツ肌の色
- 髪型
- 後ろ髪
- サイドの髪
- 後ろ髪の長さ
- アホ毛の設定
- 眉毛の設定
- 瞳の色
- 瞳の輝き
- ほくろマニュキュア
- 唇の色
- 口の形(八重歯など)
です。
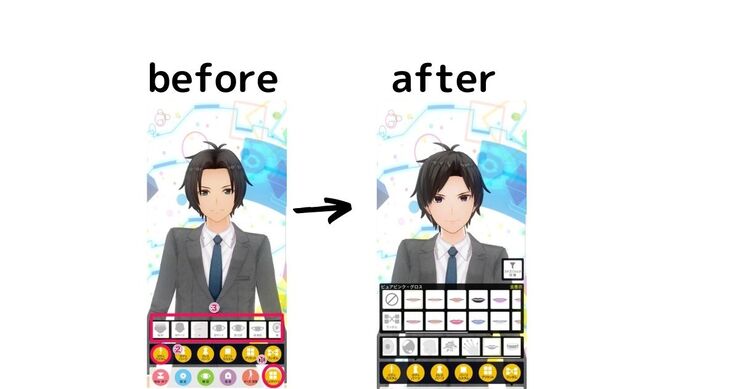
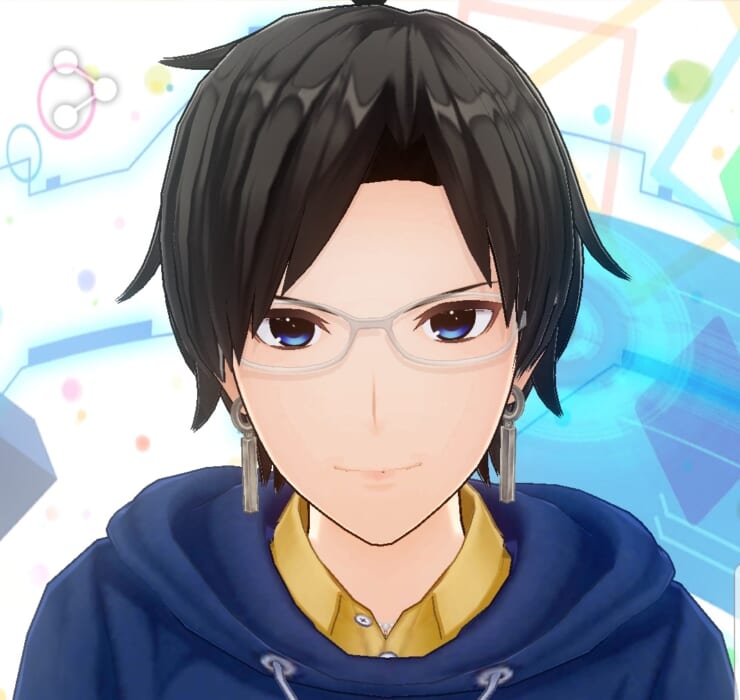
ボディパーツを設定した結果が以下の画像です。
最初と比べると、だいぶ変わったのではないでしょうか。
ドレスパーツ
次にドレスパーツの項目に移ります。
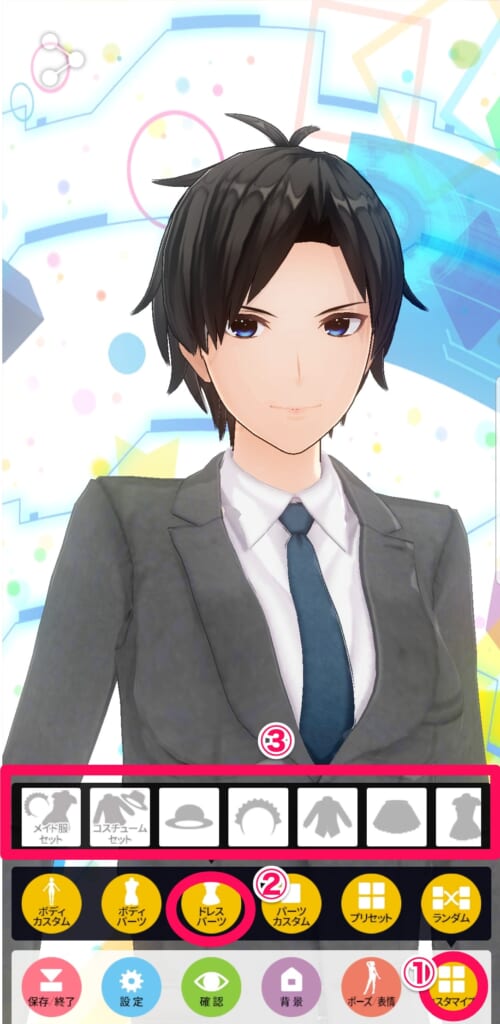
ドレスパーツでは、
- メイド服セット
- コスチュームセット
- 帽子など
- 髪飾り
- 上の服
- 下の服
- ドレス
- 靴下
- 靴
- ピン留め
- メガネ
- 目元のコスチューム
- 顔のコスチューム
- イヤリング・ピアス
- 手袋、ネックレス
- リボン
- リストバンド
- アームバンド
- しっぽ
- 羽
などが選べます。
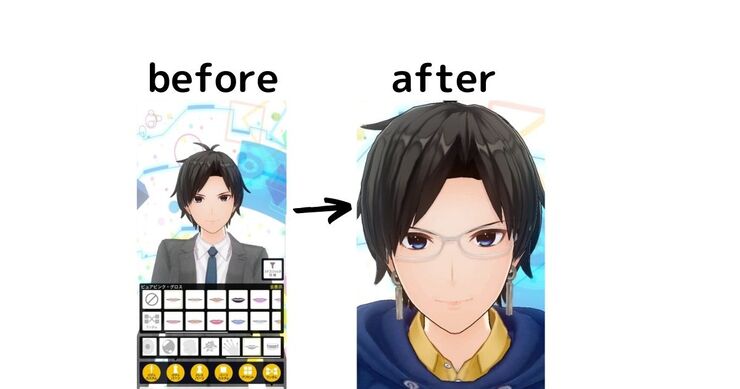
実際につくったのがこちら
最初と比べると、かなり雰囲気が変わりましたね。
ボディーパーツ設定後と比較しても変わっています。
パーツカスタム
次にパーツカスタムを見ていきましょう。
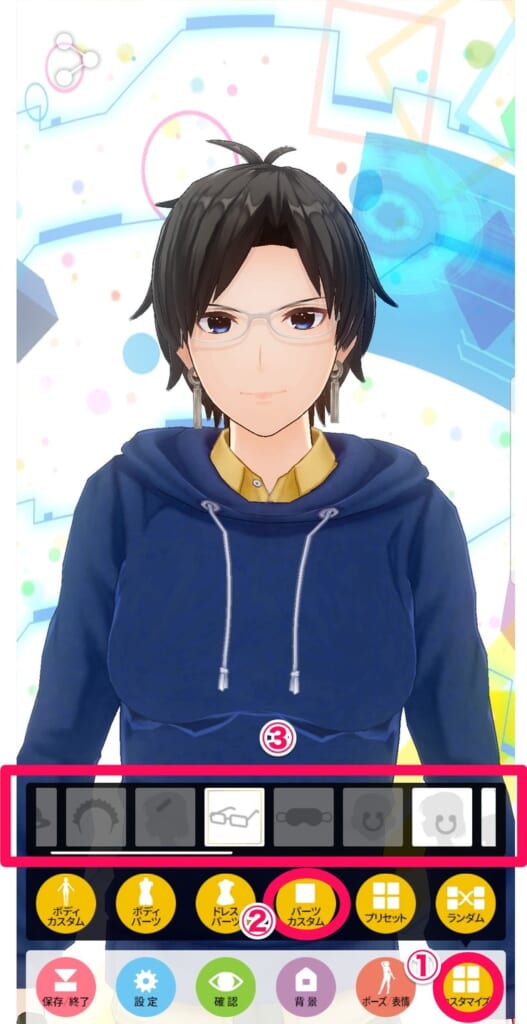
パーツカスタムでは、今まで身につけてきたアイテムの位置の変更ができます。
たとえばメガネなら、画像のようにずらしたりできます。
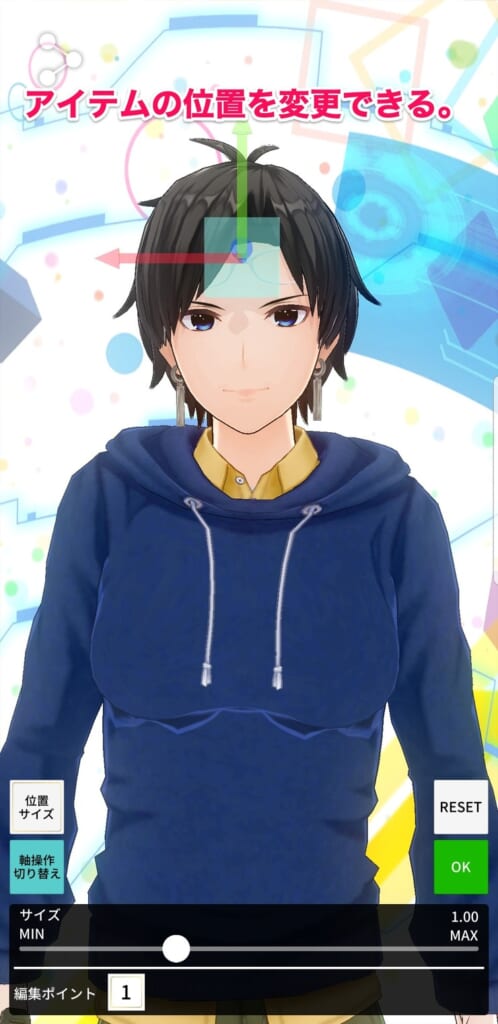
個人的にはあまり必要がないと思ったので、アレンジは加えませんでした。
自分のお好みで設定してみてください。
次はプリセットです。
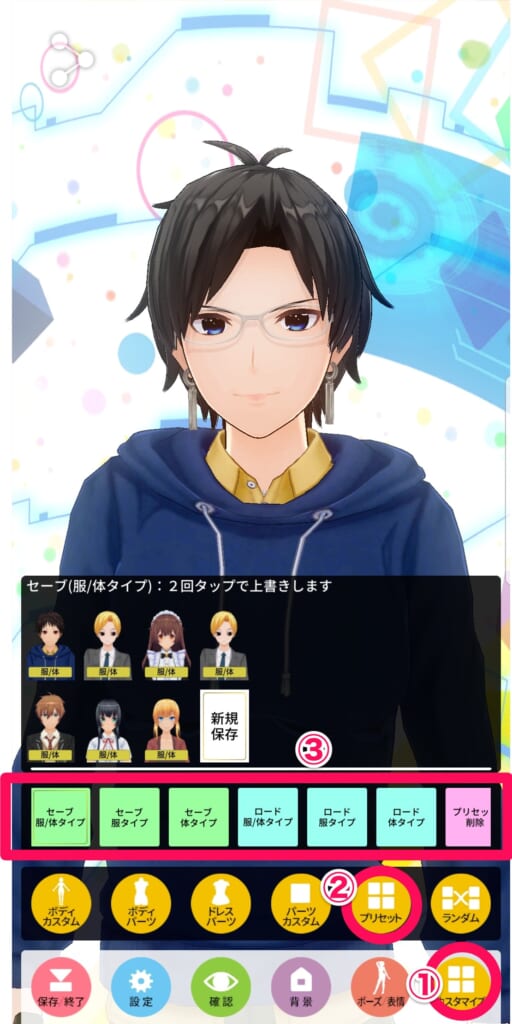
お気に入りの組み合わせが見つかったら、プリセットに保存しておきましょう。
ランダム
最後はランダムです。
ランダムはその名の通り、顔、体型、アイテムなどをランダムで決めてくれる機能です。
一部アイテムを選ぶ場合は、ランダムで決めてほしいアイテムを選択し、実行を押します。
私の場合、以下のようなアバターになりました。
なかなか、味がありますね。
次は全選択を選んだ場合はどうなるか、見てみましょう。
ランダム前の面影はなくなってしまいました。
カスタムキャストで配信する準備と方法
ここでは、カスタムキャストで配信する準備と方法をお伝えします。
まずは、準備からです。
カスタムキャスト配信前のアバターの準備
配信する前にアバターの設定をして準備をします。
まずは下の「配信」をタップしてください。

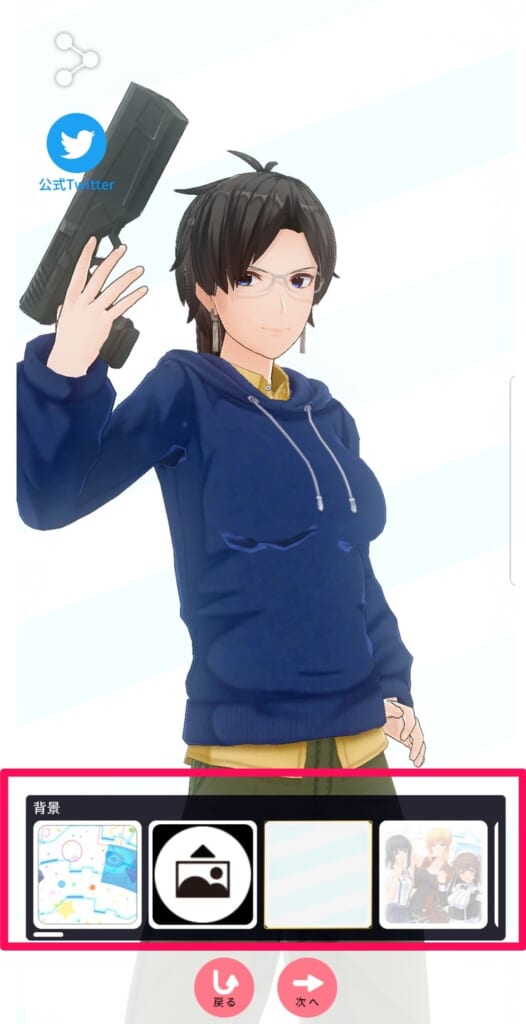
次に配信をするアバターの選択をしましょう。
次に配信の時に使われる背景を選択しましょう。
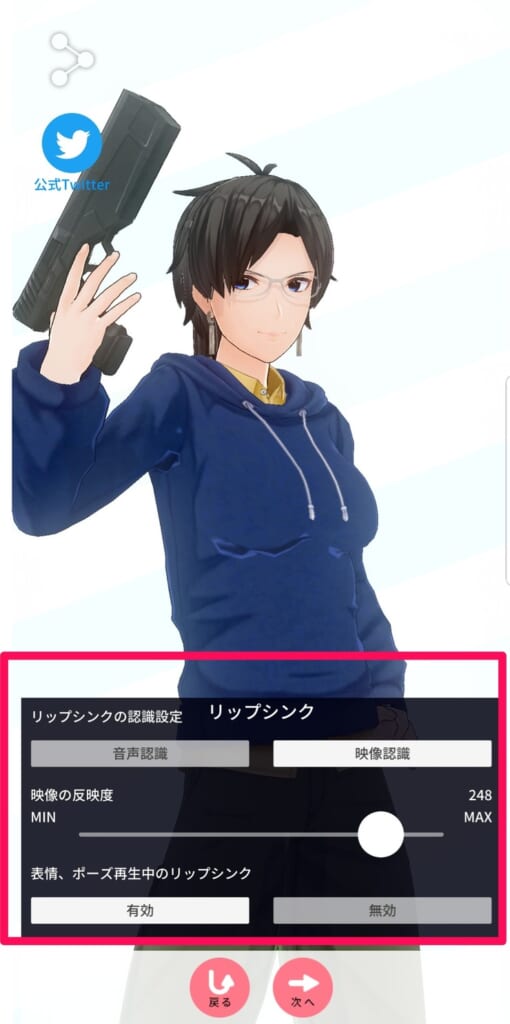
次にアバターの口の動きを音声で認識するか、映像で認識するかを選択してください。
表情や、ポーズの最中の時も同様に、有効にするか無効にするかを決めます。
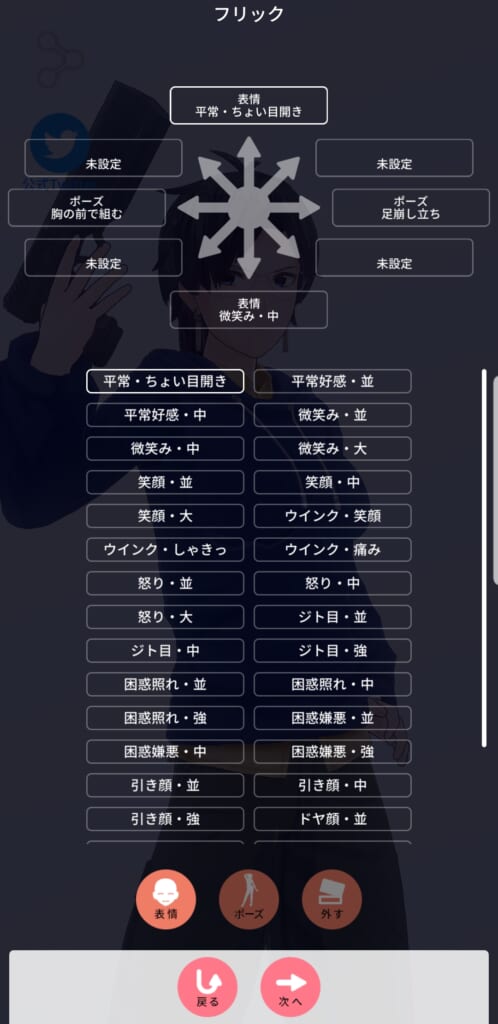
次は、ポーズや表情の設定です。
上の8つの矢印は、フリックの方向によって、ポーズや表情をしてくれるというものです。
たとえば下の例の場合、上にフリックすると、表情が平常で目がちょい見開きになります。
お好みで設定しましょう。
次の画面は、先ほど操作感を試せる画面になります。
前の画面で設定した、ポーズや表情がきちんと反映されているか、自分の好みかなどを確かめてみてください。
ここまでで、配信準備は完了です。
カスタムキャストで配信する方法
準備が完了したら、いよいよ配信に移りましょう。
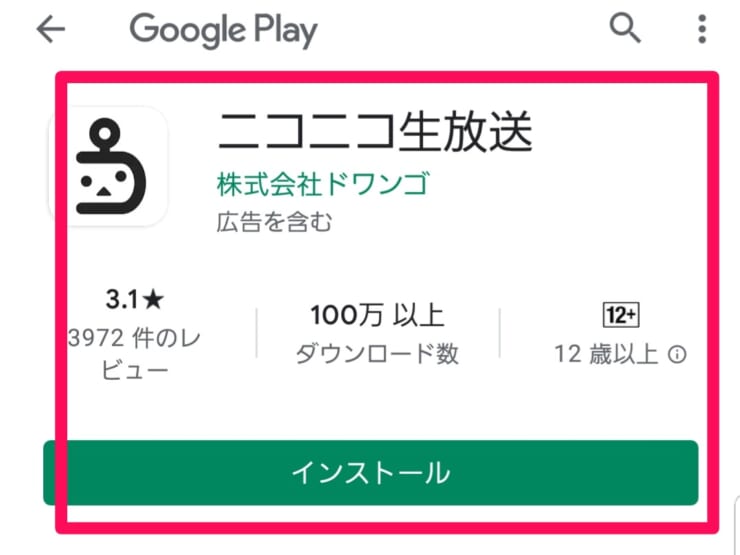
その前に、カスタムキャストを配信するためには「ニコニコ生放送」というアプリをダウンロードする必要があります。
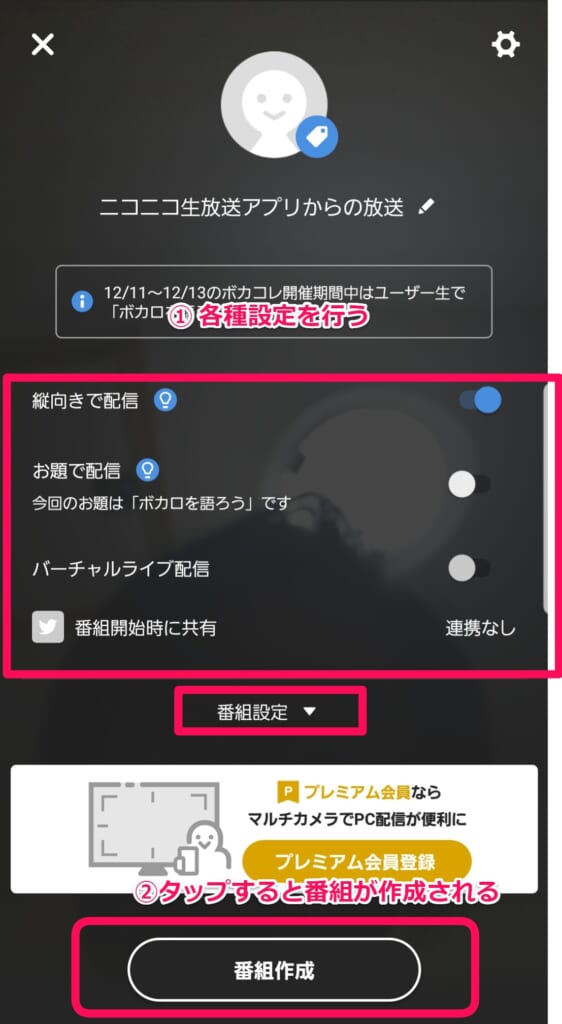
先ほどの画面の右上に歯車のマークがあるので、タップしましょう。
すると、配信開始というアイコンが出てくるので、タップしてください。
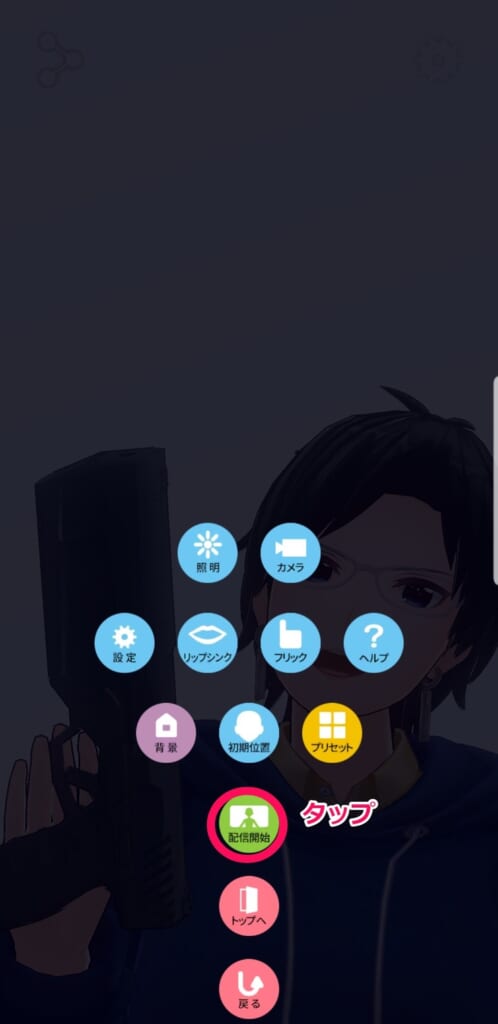
配信開始をタップすると、ニコニコ生放送の画面に遷移します。
各種設定を行い、番組作成をタップしてください。
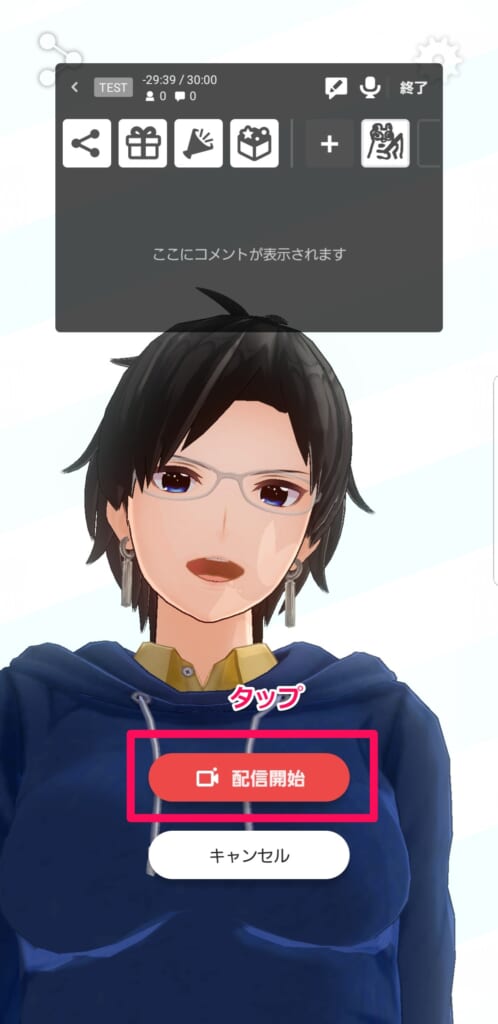
配信開始をタップします。
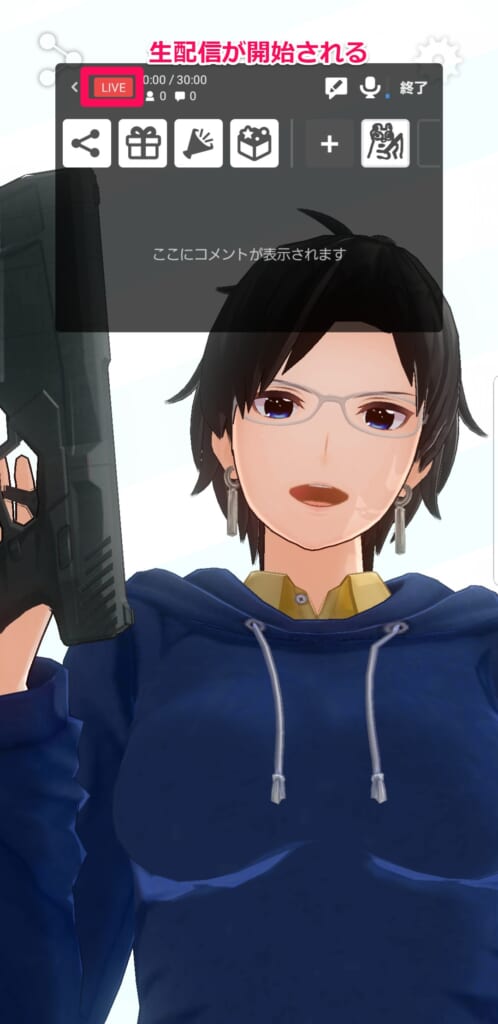
生配信が開始されます。
配信の方法は以上です。
カスタムキャストでYoutube配信する方法
カスタムキャストをYouTubeで配信する流れは以下の通りです。
- ミラーリングソフトのインストール
- スマホとPCをミラーリングする
- OBS Studioの設定をする
- YouTubeの設定をする
- OBS Studioで配信開始をクリック
順番に見ていきます。
前提として、YouTubeで配信するためには、2つのソフトとYouTubeのチャンネルが必要です。
2つのソフトというのは、スマホ画面をミラーリングするソフト(ApowerMirror)と、OBS Studioです。
YouTubeチャンネルを持っていない人は、YouTubeチャンネル作成方法まとめを参考に、チャンネル登録をしましょう。
ミラーリングソフト(ApowerMirror)のインストール
まずApowerMirrorをお使いのPCとスマホにインストールをします。PC版はこちら
スマホ版は、iOSの場合アップルストアから、Androidの場合GooglePlayストアからインストールしましょう。
インストールし終わったら、PCとスマホでApowerMirrorを立ち上げます。
お使いのPCとスマホを同じWi-fiでつなぎます。(USB接続でも可能です)。
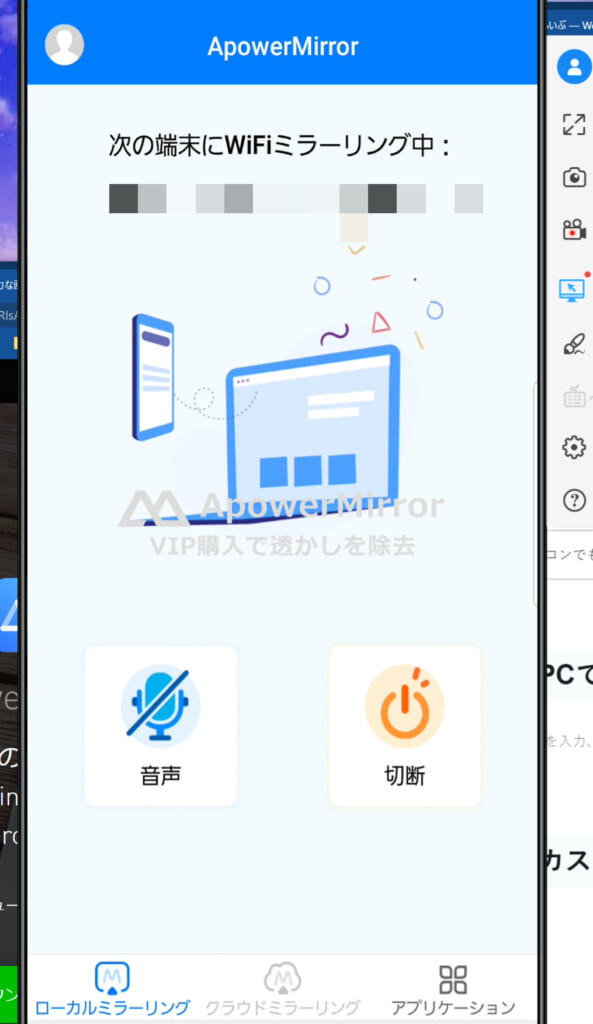
この時以下のような表示がされますので、スマホ画面からミラーリングをタップしてください。
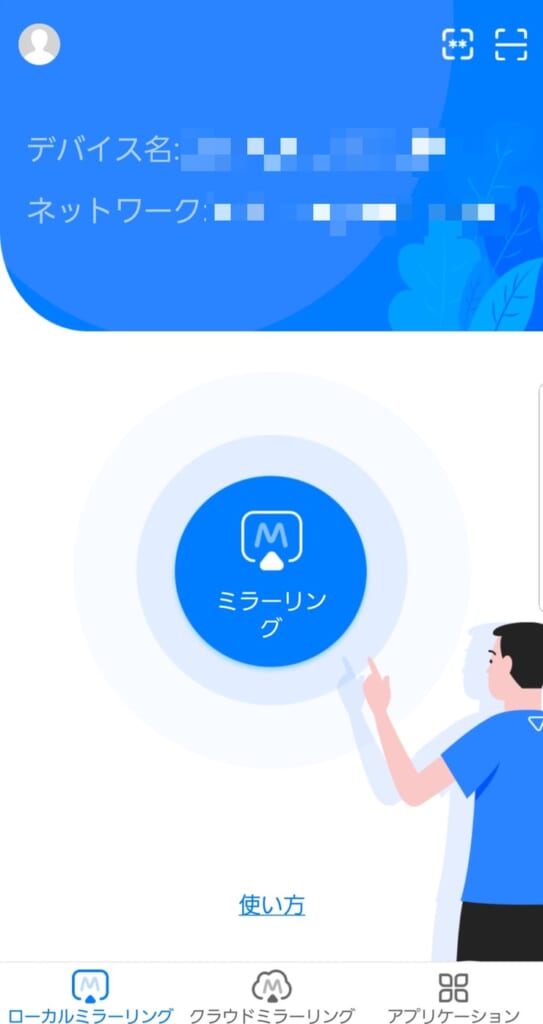
うまく接続できていれば「スマホ画面をPCに映す」といったパネルが出るので、タップします。
PCでもApowerMirrorを立ち上げておくと、以下のような画面になり、スマホの画面がPC上で見れます。
OBS Studioの設定
次にOBS Studioの設定をします。
OBS Studioをダウンロードしたら開きましょう。
開いた画面の右下に設定ボタンがあるので、クリックします。
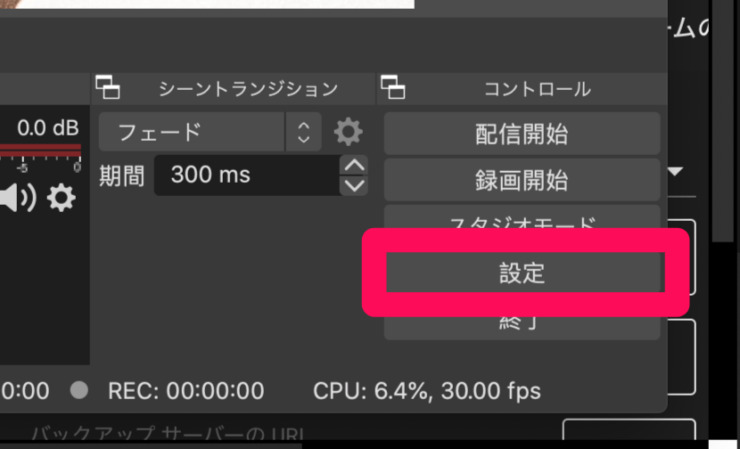
設定画面に移ったらまずは、「配信」という項目をクリックしてください。
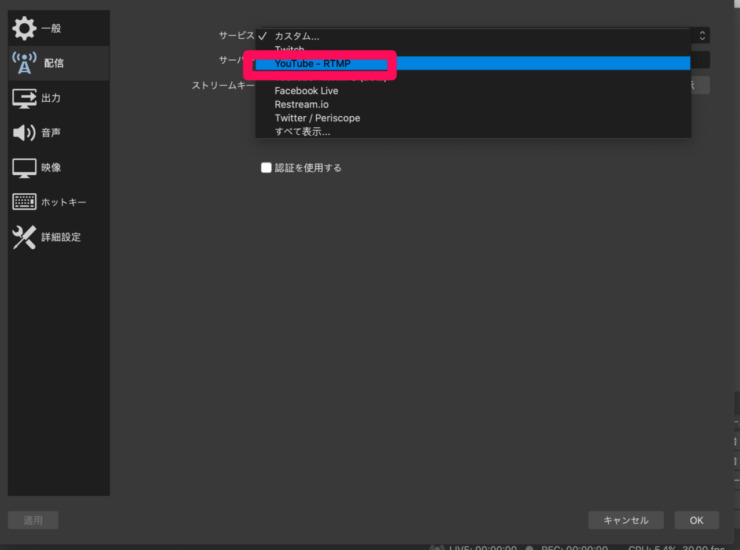
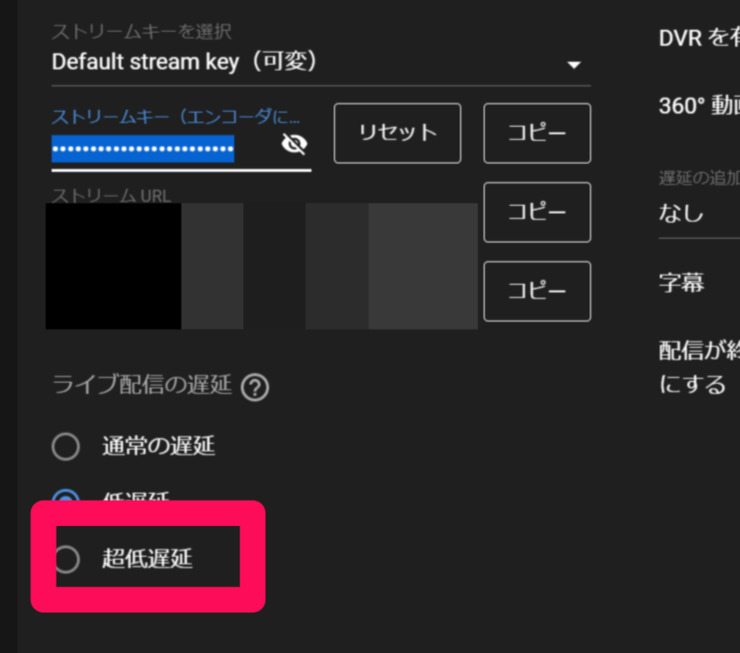
サービスを「YouTube/YouTube Gaming」か「YouTube-RTMP」を選択しましょう。
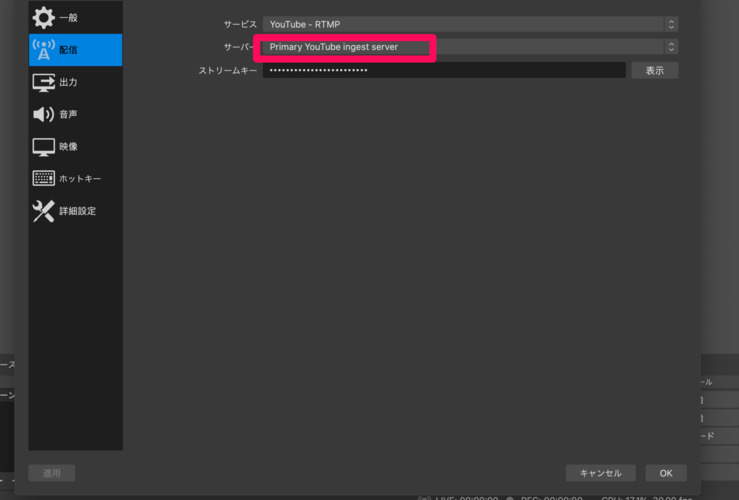
サーバーは、「Primary Yotube ingest server」になっていればOKです。
YouTubeの設定
次にYoTubeの設定をします。
YouTubeトップ画面から、右上のビデオボタンをクリックし、「ライブ配信開始」をクリックしましょう。
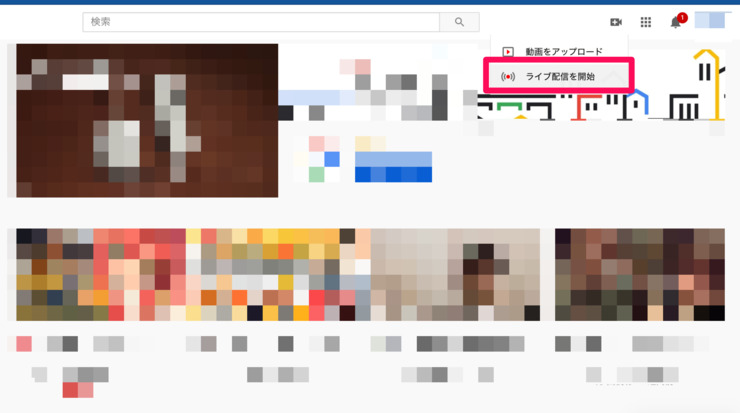
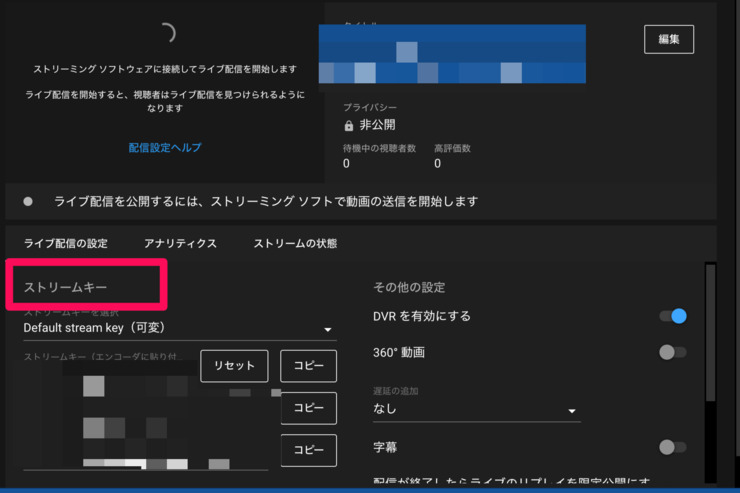
ライブ配信開始をクリックすると、以下の画面に遷移します。
ストリームキーという項目があるので、コピーをしてOBS Studioの該当の箇所に貼り付けてください。
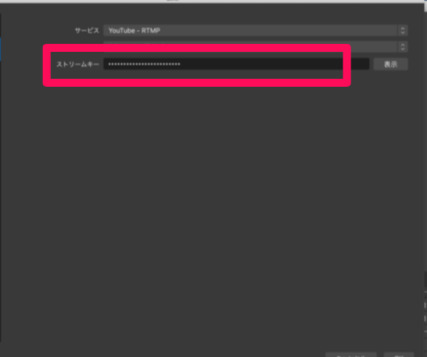
さきほどコピーしたストリームキーを、OBS Studioの配信項目の「ストリームキー」に貼り付けます。
次に、OBS Studioの細かい設定をしていきますね。
OBS Studioの出力設定
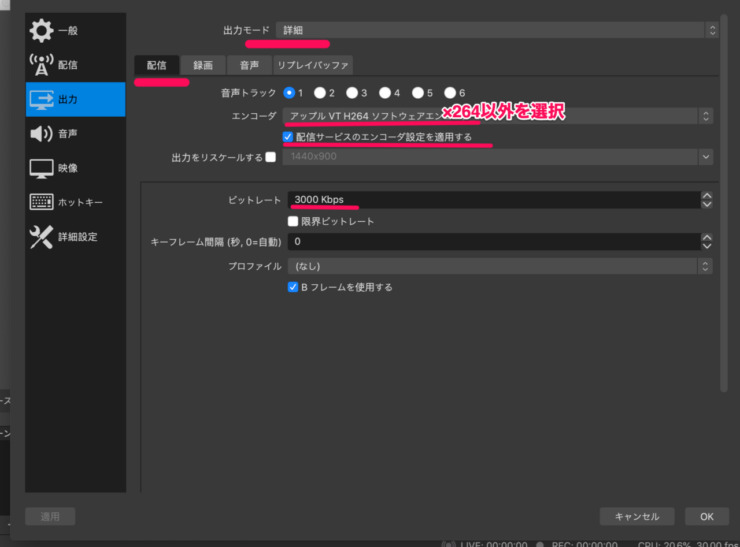
OBS Studioのトップ画面右下の設定から、出力項目をクリックしてください。
ここでは以下のように設定をしましょう。
- 出力モードを「詳細」へ
- エンコーダを「×264」以外にする
- 「配信サービスのエンコーダ設定を適用する」にチェックが入っているか確認
- 必要があればビットレートの調整(3000kbpsより上げると動画がカクつきやすい)
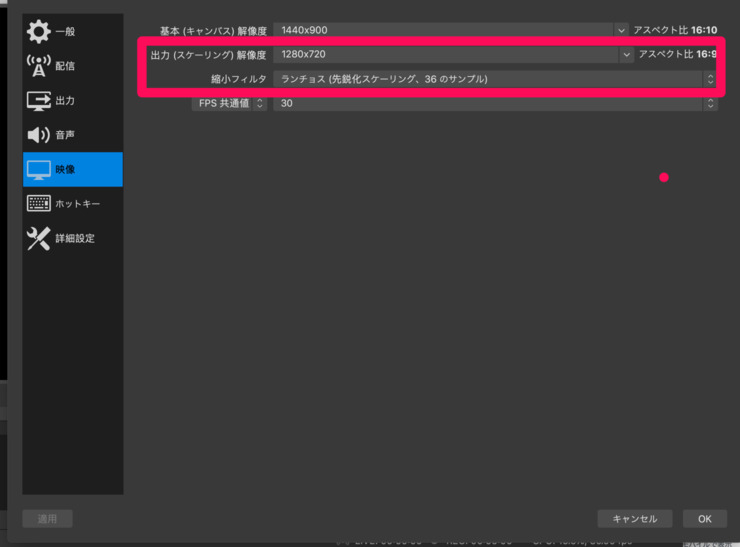
OBS Studioの映像設定
次は、映像設定です。
まずは、映像の項目をクリックしてください。
映像設定は以下の通りに行いましょう。
- 「出力(スケーリング)解像度」を「1280×720」へ
- 「縮小フィルター」を「ランチョス」に設定
OBS Studioの音声設定
次は、音声設定の設定です。
音声の項目をクリックしてください。
音声設定は以下の通りに行います。
- PCにマイクを接続
- デスクトップ音声を「既定」にする
- マイク音声を使用するマイクに設定
細かな設定は以上で完了です。

カスタムキャストでの設定
次に、カスタムキャストの設定をしていきましょう。
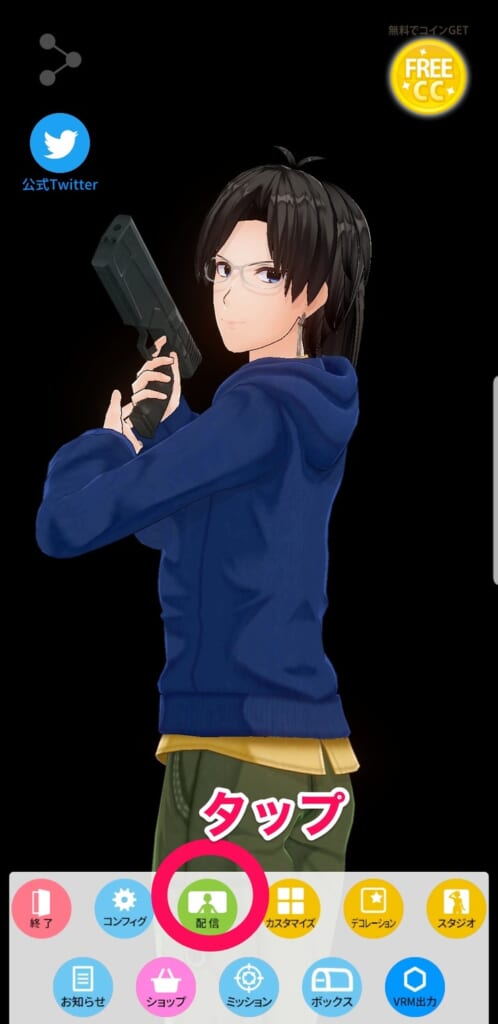
配信をタップし、使用するアバター、背景を選択します。
ここでは、クロマキー合成を使いたいため、背景を緑色にしています。
また、リップシンク、表情、ポーズの設定もしてくださいね。
OBS Studioの設定に戻る
次にOBS Studioの設定に戻りましょう。
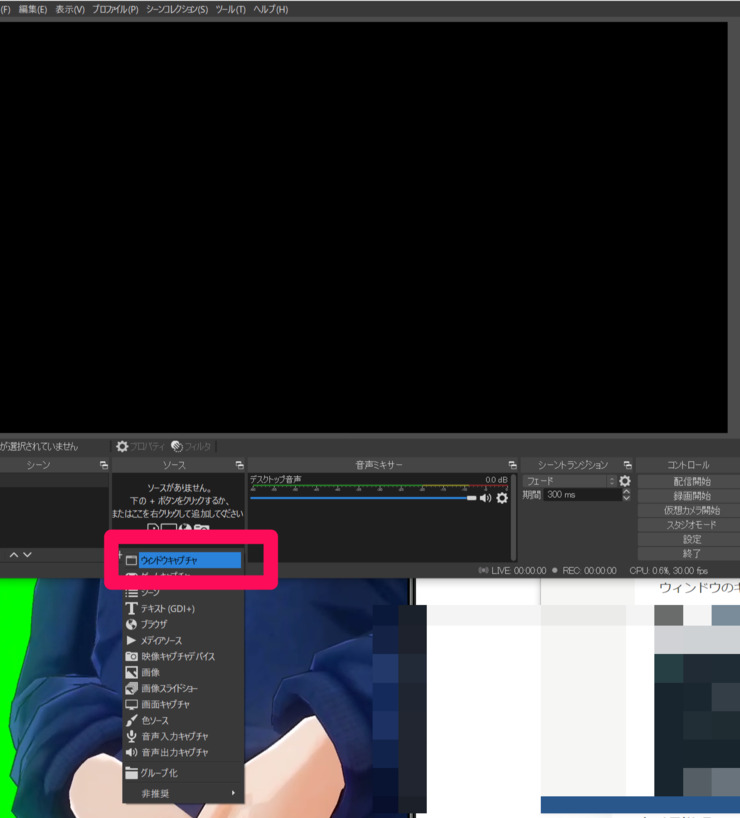
OBS Studioのウィンドウを開くと、左から二番目のブロックにソースという項目があります。
ソースの下に「+」マークのボタンがあるので、クリックします。
すると配信形態を選べるので、ここでは、ウィンドウのキャプチャーを選択しましょう。
選択すると、ソースの名前を決められます。
お好みで決めてみてくださいね。
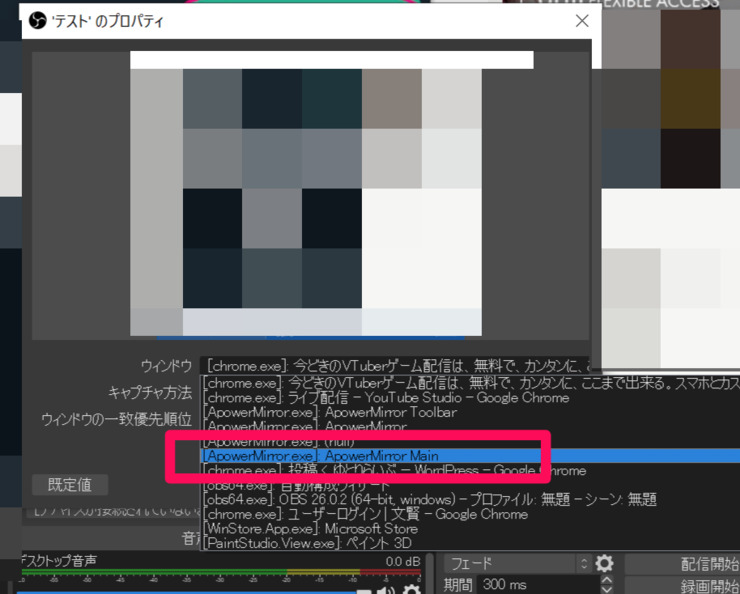
次に、ウィンドウの項目から「ApowerMrror Main」をクリックします。
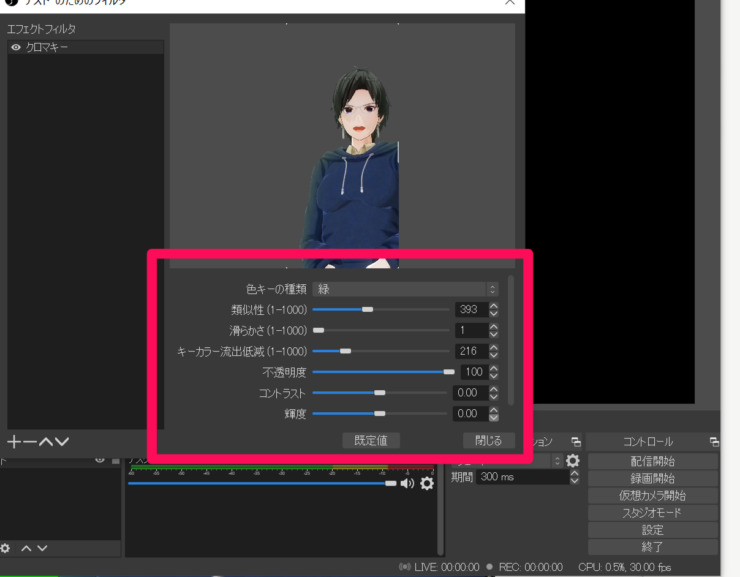
次にクロマキー合成を選択しましょう。
クロマキー合成は、ソースの「フィルタ」から選択できます。
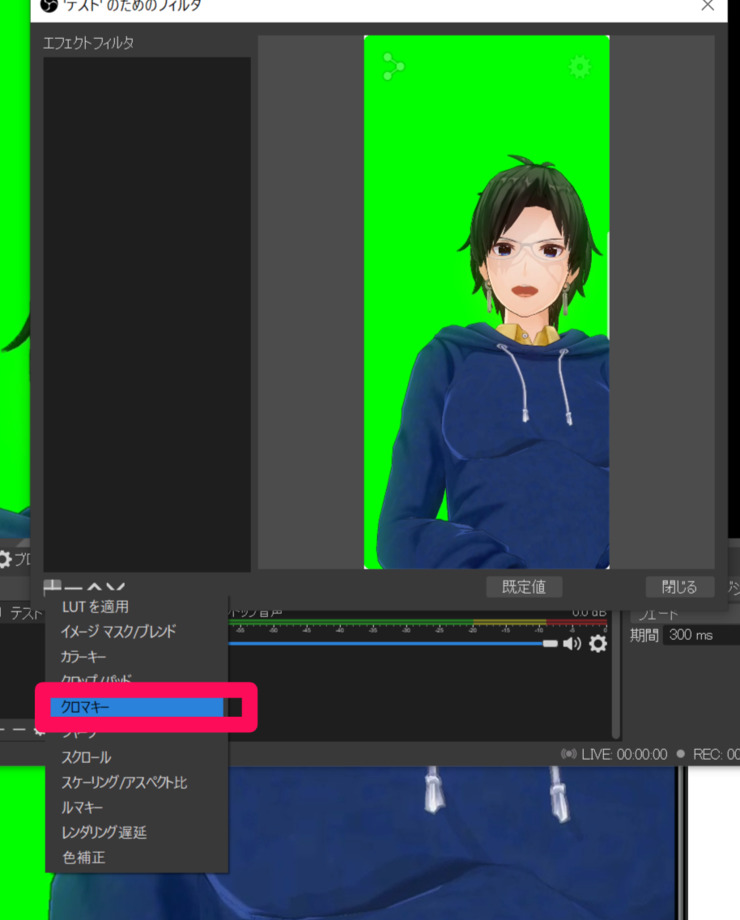
クロマキー合成は細かい色調の変更が可能です。
好みに合わせて調整しましょう。
YouTubeの設定に戻る
次に、YouTubeの設定に移りましょう。
エンゲージの画面内の右上に「編集」というボタンがあります。
「配信タイトル」、「配信の内容」などを編集できます。
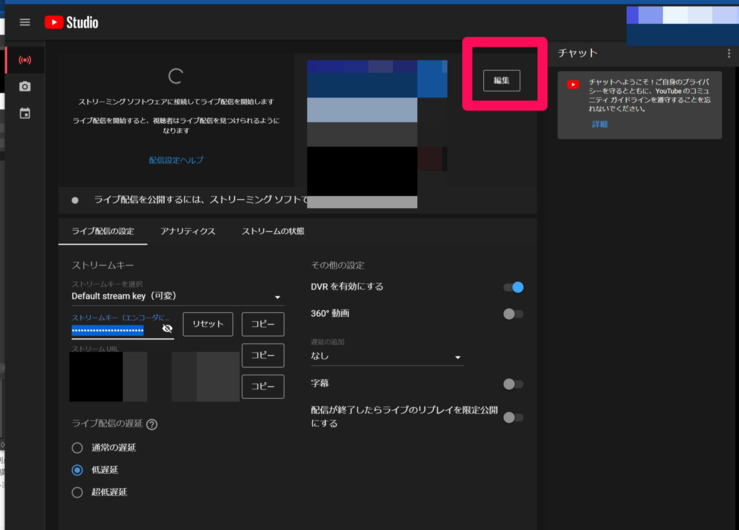
エンゲージ内の右上には、SNS共有ボタンがあるので、共有したい人は使いましょう。
あとは、OBS Studioで配信開始を押すだけです。
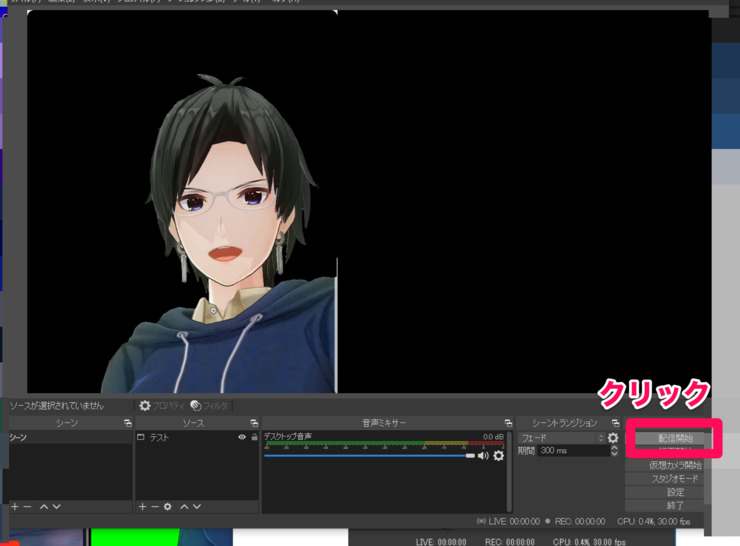
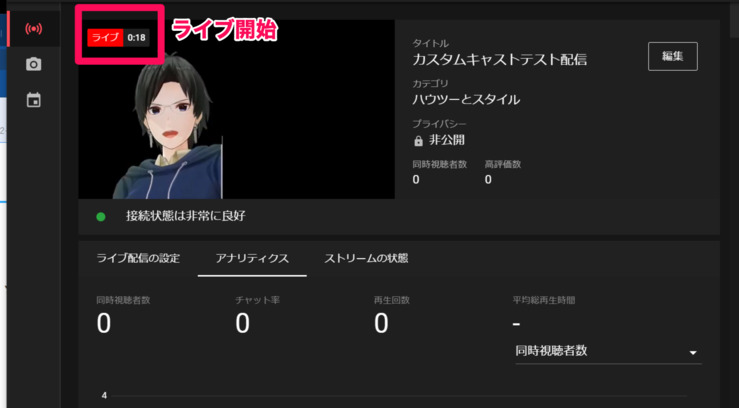
YouTubeを見てみてると、ライブ配信が開始されています。
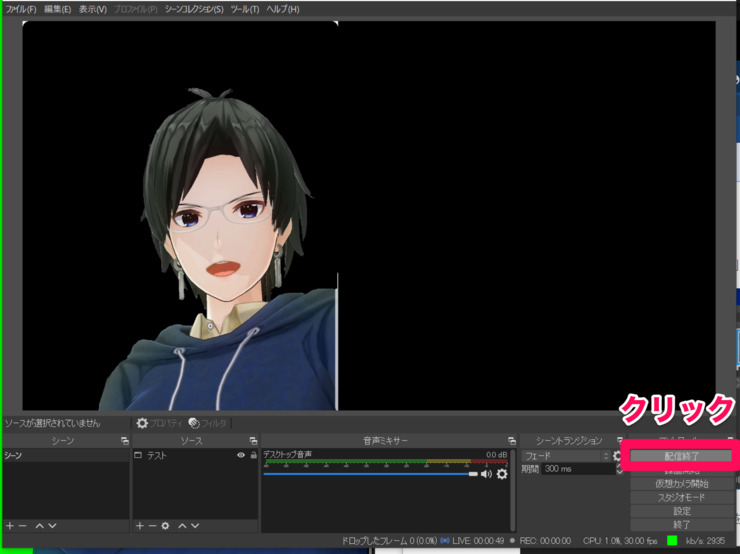
ライブを終了したい場合は、OBS Studio内の「配信終了」をクリックしてください。
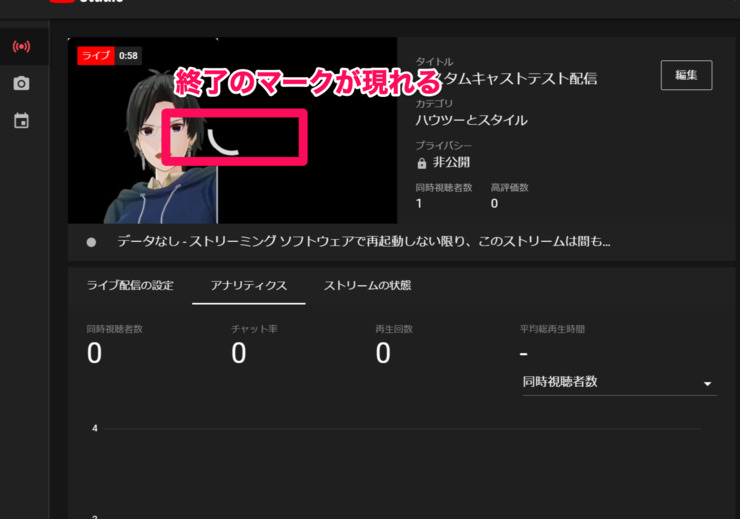
YouTubeを見てみると、終了のマークが現れ、すぐに配信が終了できます。
YouTubeでカスタムキャストの配信をする方法と、配信を終了する方法は以上です。
PCでカスタムキャストは使える?
PCからカスタムキャストを使うためには、Bluestacksを使いましょう。
Bluestacksは、メジャーなアプリをPC上で操作できるソフトです。
スマホの6倍も動作が軽くなるので、快適にアプリを楽しめます。
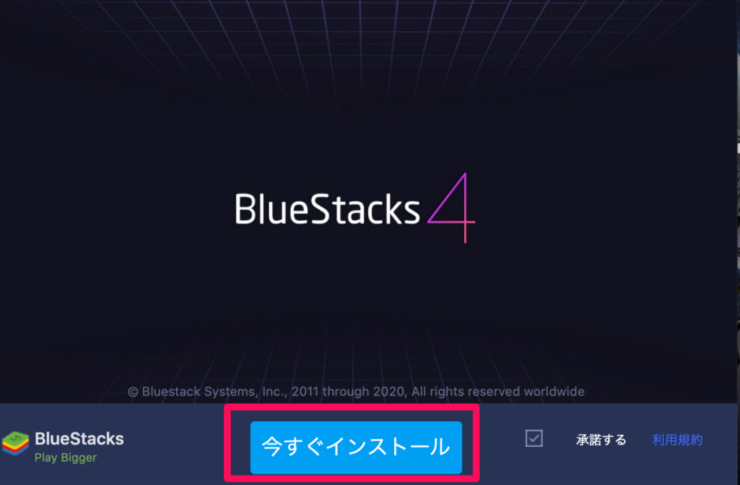
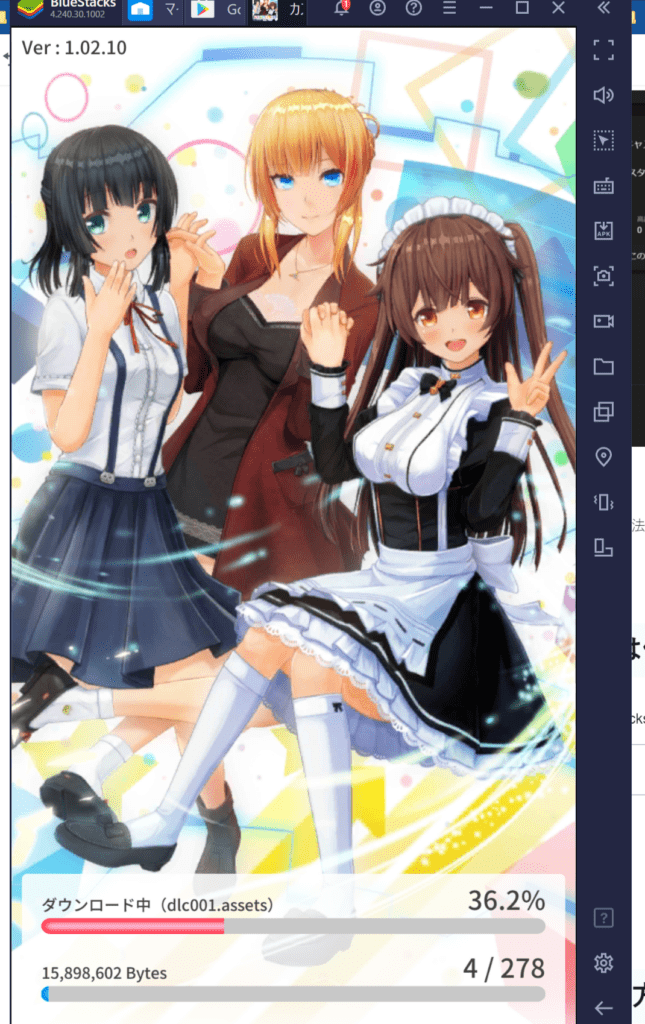
Bluestacksのダウンロード
まずはBluestacksをダウンロードし、インストールします。
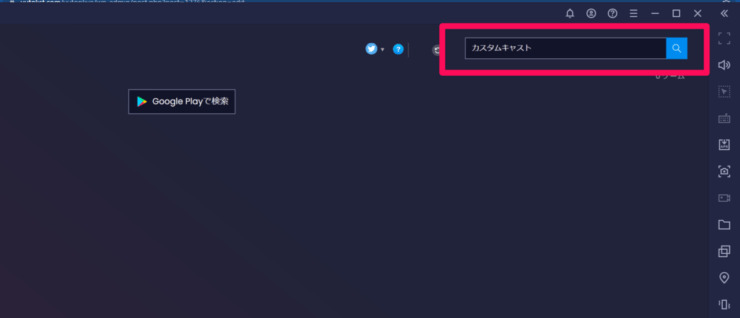
インストールが完了すると、Windowsの場合、GooglePlayストアのアカウントを求められるので、サインインしましょう。
サインインをしたら右上の「検索」に「カスタムキャスト」と入力しクリックしてください。
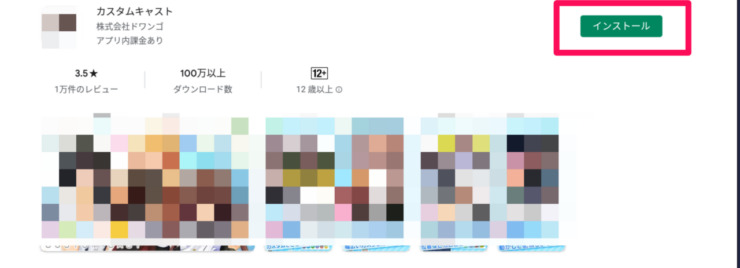
カスタムキャストのインストール
Bluestacksのインストールが完了したら、GooglePlayから「カスタムキャスト」をインストールします。
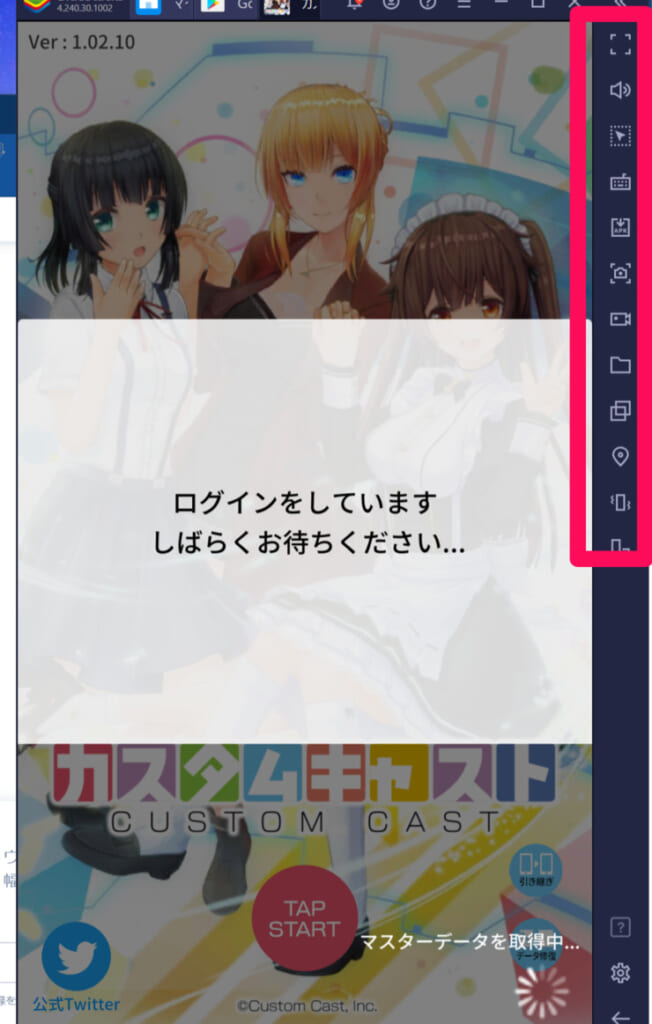
「開く」を押すと、PC上でカスタムキャストが起動されるので、ダウンロードをクリックしましょう。
あとは、流れに沿ってプロフィールの設定などを行いましょう。
Bluestacksから配信にをする場合も、マイクとカメラがある環境なら「ニコニコ生放送」をインストールすることでPC上から配信可能です。
お好みに合わせてカスタマイズしてみてくださいね。
PCでカスタムキャストを使う場合の操作説明は以上です。
「カスタムキャストの使い方まとめ
ここまで、カスタムキャストの使い方を紹介してきました。
カスタムキャストは誰でも手軽にVtuberになれる、現代のニーズにマッチしたアプリです。少し工程はかかるものの、OBS Studioやミラーリングソフトを使ってYouTube配信もできます。
今まで、顔をだすことに抵抗があり、配信できないといった人にもピッタリのアプリです。カスタムキャストで自分だけのオリジナルのアバターを作って、Vtuerデビューをしてみませんか。
他にもVtuberとしてスマホ1台で気軽に活動できるアプリや、顔出しせずに声のみでライブ配信できるアプリがあるので気になる人は下記の記事をチェックしてみてください。

おすすめライブ配信アプリランキング
いま最も熱いおすすめのライブ配信アプリを一挙に紹介しています。
どのライブ配信アプリにしようか悩んでいる人は参考にしてみてください!


よかったらコメントしてね!